Showing posts with label Cooking. Show all posts

Sunday, March 20, 2016

Cassoulet

Recently, I made my first-ever trip to Europe.  I was pleasantly surprised to have dined in some fabulous French restaurants while in Paris and my partner and I have been inspired to make French cooking night a weekly routine.  Without a doubt, I took this challenge full-force and we began with this hefty task:  Cassoulet.

With beans and duck as a base, it was an arduous task that took us a lot longer to finish than we had hoped, but the taste was amazing.  If you're up for somewhat exotic meat (I've never made duck myself before) and beautiful flavors blended together, this is worth a try... as long as you have several hours on hand.

http://www.saveur.com/article/Recipes/Cassoulet-Au-Canard-Duck-Casserole

Enjoy!

Layers of beans, duck/sausage, topped with duck fat bread crumbs

Paired with Pino Noir and a baguette from Acme Bakery

Having fun on this multi-step process meal

In charge of preparing the duck!

Saturday, January 3, 2015

Apple & Brie Crostini

There are some food pairings that are way out in left field.  One of these pairings, apples and brie cheese, have been a recurring favorite of mine (in addition to others like tomato, mozzarella and basil... caprese!).  It tastes so good with a crusted baguette... a perfect snack, appetizer or dinner in large quantities.  ;)

Ingredients:

1 baguette, sliced diagonal, approx 1/2 inch
1 wheel brie cheese
1 apple, sliced thin

Directions:

1. Cut the brie cheese into quarters and bake at 350 until center is beginning to ooze, approximately 10-15 min.  You can use a toaster oven for the small quantity.

2. While the cheese is baking/melting, toast the baguette slices on a pan in extra virgin olive oil until golden on each side, adding evoo as needed.

3. Stack the baguette, a slice of apple and cheese.  Enjoy!

Toasting the baguette slices!

Beautiful golden color and so delicious

Melted just enough!  Oozes more after you take it out of the oven

I prefer the sweeter apples... the tart ones don't taste
quite right with the cheese

Stacked.  No particular order- whatever your heart desires!

Wednesday, October 1, 2014

Secrets from a Nutritionist

Ever look at ingredients in a recipe and think to yourself "man, I wish I could take that out, but what would I substitute it with?" or "I have these ingredients but I don't want to be eating casserole for the next 5 days.  What else can I do with this?"

Here is a quick slideshow of 30 tips/tricks from a nutritionist.  I will definitely be looking back at this for ideas when I get stuck with no ideas in the kitchen.


Friday, November 1, 2013

Vanilla French Macaroons

Hello and welcome!  It's been awhile since I've posted something delicious on this blog.  I've been busy traveling, perfecting, and... well... consuming foods of all kinds!

By popular request (via photos on Facebook) I have been asked to post the secrets of making French Macaroons, a delightful little cookie with a lot of complex textures & consistencies; however, once perfected, they are the perfect bite-sized snack and are a treat every single time you make them.  Plus, they can vary in both flavor and color, so eating these treats is never a bore (not that they will ever be, but variety is the spice of life).

It had been awhile since I made these.  Having a fully stocked kitchen has so many benefits and choices, it's hard to leave home and go to an empty kitchen, cooking with just the bare essentials.  Every time I come home, I bake bake bake, because it's not worth buying a whole bag of sugar just to use one cup for a batch of cookies, not to mention teaspoons of baking soda, vanilla extract, flour, etc.

Don't worry if you don't have all those things in your kitchen!  French macaroons are so easy, it requires only a few ingredients (which make it delicious.  In cooking, sometimes less is more).  Without further adieu, I present to you vanilla French macaroons with chocolate creme (or as I like to call it, black and tan).

Black and Tan French Macaroons

Vanilla Macaroons
3/4 cup ground almonds (you can buy bits/slices and grind them in a food processor)
1 cup confectioners' sugar (also known as powdered sugar)
2 extra large egg whites, room temperature
1/4 cup superfine sugar (also known as Baker's Sugar)
1/2 tsp vanilla extract
2 bowls
1 sifter
spatula
mixer
piping/pastry bag (I use disposable ones) with .5 inch tip (I prefer smaller, since the batter is somewhat runny)
*Makes approximately 16 sandwiches (I prefer making smaller ones so I can eat "more" ^_^)


Line 2 baking sheets with parchment paper.  Mix the ground almonds and confectioners' sugar in a food processor for approximately 15 seconds.  Sift the mixture into a small bowl and set aside.

Beat egg whites in a large bowl until it holds soft peaks. Gradually beat in the superfine sugar to a glossy meringue.  Beat in the vanilla extract.

Fold the almond/sugar powder into the meringue with a spatula 1/3 at a time, folding/cutting thoroughly.  Your batter will look shiny with a thick, ribbonlike consistency.

Fill the piping/pastry bag with batter carefully.  Pipe 32 small circles onto the baking sheets (I make them smaller and cuter so I can have more).  Tap the baking sheet on the counter to extract air bubbles.  Let stand at room temperature for 30 minutes (this gives the macaroon the hard top shell).

Preheat oven to 325 F.  Bake one sheet at a time on center rack for 10-15 minutes.  This part is important!  If you overbake, your macaroon will be hollow and have no chewy center, in addition to burning.  If you underbake, your macaroon won't frill around the edges and won't peel off the parchment paper. Check your macaroon at 8 minutes, just in case.  Your macaroon should look light tan and easily peel off the parchment paper.  The smaller the macaroon, the shorter the baking time (not by much, maybe just a minute or three).

Cool for 10 minutes on a cooling rack, removing the cookie from the pan.  Make sure you cool completely.  Ta-dum!  You're done!
Notice the glossy top & the frill around the edges.


Chocolate Filling
3.5 oz semisweet chocolate, finely chopped
2/3 cup heavy cream (yes!)

Place the chocolate in a heat proof bowl. Heat the cream in a saucepan until just boiling on med-low.  Pour the hot cream over the chocolate and stir until smooth.  Cool for 15-20 minutes (I preferred refrigerating mine to make it a thicker, creamy texture) and stir.  Use to sandwich pairs of macaroon cookies together!

Itty bitty bite sized treats!
Hope you enjoyed this recipe.  Remember to be patient and be careful.  These cookies are extremely fragile but are worth the care.  I had to make these while kiddos were ringing my doorbell for trick-or-treats!  Best of luck to those who try this, and don't give up!  If at first you don't succeed, try try again.  :)


PS- what did we do with the egg yolks?  We made white chocolate creme brulee.  ^_~

The crayola crayon is pro at making this dessert :D

Sunday, March 24, 2013

Forks Over Knives


The pandemic of Americans today is not sickness related; it is disease caused by over-consumption and the consumption of too much red meat and processed foods.

If you haven't seen the documentary film Forks over Knives, I highly suggest you watch this wake-up call.  Warning: this movie may change your life forever... or you can feint ignorance and decrease your lifespan and your quality of life by compromising your health.

"Let food be thy medicine."  - Hippocrates

This is the true wake up call.  Change today: start by eating a whole foods, plant-based diet and you will see the difference in the numbers, your lifestyle, and your mental health.

Forks Over Knives official website:  http://www.forksoverknives.com/
IMDB: http://www.imdb.com/title/tt1567233/

Tuesday, November 20, 2012

Chicken Pot Pie

I recently entered a Bake Off contest at my work.  Although my pie didn't win first place, third place was a fantastic accomplishment!  I got so many compliments that I had to share the recipe with the entire building.  It was the only savory pie in the whole competition of 13 delicious pies.

Enjoy the recipe!


Chicken Pot Pie

Prep time: 40 minutes
Cook time: 40 minutes
Servings: 8-12


Ingredients:
 
1 lb. boneless skinless chicken breasts, cubed
1 cup sliced carrots
1 ½ cup sliced celery
½ can (8 oz) sweet kernel corn
3 potatoes, peeled and cubed
3 ½ cup chicken stock
2/3 cup butter
1 ½ cup chopped yellow onion
2/3 cup all-purpose flour
1 tsp salt
1 tsp black pepper
½ tsp celery seed
1 tsp garlic powder
1 1/3 cup milk
1 egg white
2 9-inch unbaked pie crusts in pan
2 9-inch unbaked rolled pie crusts


Directions:

1.     Preheat oven to 375˚.

2.    In a stockpot, combine chicken, carrots, celery, corn and potatoes.  Add chicken stock to cover and boil on medium for 15 minutes. Remove from heat and drain stock into a separate container.

3.     In a saucepan over medium heat, cook onions in butter until soft and translucent. Stir in flour, salt, pepper, celery seed and garlic powder.  Slowly stir in chicken stock and milk, making sure no lumps form. Simmer gravy over medium-low heat until thick.

4.    Brush the egg white on the bottom pie crust in pan.  Bake for 5 min. to prevent soggy crust from filling.

5.    Place the chicken/veggie mixture in bottom pie crust. Pour gravy mixture over.  Cover with top pie crust, seal edges, and cut away excess dough.  Make + slits in the top to allow steam to escape.

6.    Bake for 40-45 minutes or until pastry is golden brown and filling is bubbly.  Cool for 10 minutes before serving.

Sunday, October 28, 2012

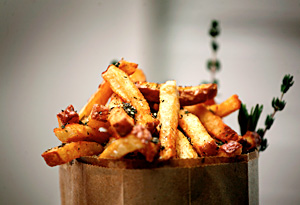
Village Fries + Homemade Sriracha Mayo


After traveling to Washington DC, I encountered a restaurant recommended by many of the locals: Good Stuff Eatery.  Opened by celebrity chef Spike on the Food Network Channel, we began our food adventure.


Their menu has gourmet twists that can be made by any cook (the flavors, however, are another story). Although these burgers were delicious, I'm not here to rave about the meat.

Very do-able and easily found (I found this on Oprah's website), their Village Fries were amazing.  Paired with my favorite sauce, their Sriracha Mayo, this recipe is to die for.


Ingredients
  • 5 pounds Red Bliss potatoes
  • 1 cup chopped fresh rosemary
  • 1 cup chopped fresh thyme
  • 1/4 cup sea salt
  • Canola oil for deep-frying
  • 2 cups Homemade Basic Mayonnaise (below)
  • 1/2 cup sriracha hot sauce
  • 2 Tbsp. sweetened condensed milk
  • 2 large eggs
  • 4 tsp. Dijon mustard
  • 2 tsp. white wine vinegar
  • 1 tsp. sea salt
  • 2 cups grapeseed oil
Directions
To make Homemade Basic Mayonnaise: Add the eggs, mustard, vinegar and salt to a food processor or blender. Process for 30 seconds in the food processor, or for 10 seconds in the blender. With the motor running, drizzle in the oil slowly at first, then add in a thin, steady stream until all the oil is added and the mixture is smooth. Stop the motor and taste. If the sauce is too thick, thin it with a little hot water. If too thin, process a little longer. The mayonnaise can be refrigerated in an airtight container for up to 1 week.

To make Sriracha Mayonnaise: Add the mayonnaise, sriracha and condensed milk to a food processor or blender. Puree until smooth. The mayonnaise can be refrigerated in an airtight container for up to 1 week.

To make fries: Wash and scrub potatoes under cold running water. Pat dry with paper towels. Cut in half lengthwise, then into long strips about 1/4-inch thick.

In a deep pot or deep-fat fryer, heat about 3 inches of oil until a thermometer reads 250°. Line a metal tray or baking sheet with paper towels.

Add one handful of the potatoes to the pot. Fry until tender but have no color. Remove with a slotted spoon. Drain on the paper towels. Repeat the procedure until all the strips are cooked. Refrigerate until cool.

Reheat the oil to 350°. Line the metal tray with fresh paper towels.

Add the cooled potatoes a few handfuls at a time and fry until golden and crispy. Remove with a slotted spoon. Drain on the paper towels. Toss with the rosemary, thyme and salt while the slices are still hot. Serve immediately.


Try it paired with your next burger-- you won't be disappointed.


Wednesday, May 30, 2012

Strawberry Lemon Cupcakes

Every once in awhile, we get lazy.  We want to grab something, but would prefer to make it ourselves.  Whether it's because we want it to be a bit more gourmet to spruce up the flavor or if we feel inventive, it's fun to combine pre-made with home-made every-so-often.

I made these cupcakes with the idea of limited cooking abilities and time.  Easy-peasy.

1 box lemon supreme cake mix
1 medium lemon to zest
1 container of Cool Whip (I used lite)
1-2 Tbsp strawberry syrup
Quartered strawberries
Red sprinkles/sugar decorations (optional)

1. Mix the cake mix as directed on the box.  Pre-heat oven to box directions.  Line 24 cupcake tins with cupcake paper cups.

2. Wash lemon thoroughly and zest peel into batter.  Mix and pour into tins.  Bake as directed on box.

3.  Remove and cool on wire rack completely.  Mix strawberry syrup with thawed cool whip until evenly pink. Use a spoon to dollop whip onto cooled cupcakes generously, using a spinning motion for a smooth look.  Sprinkle with red decorations and place quartered strawberry onto whip (preferably next to the "peak" of the whip for aesthetic purposes).

4.  Serve and enjoy this tangy yet sweet treat!  Easy to make and doesn't take a lot of time.  Have fun!


Saturday, May 19, 2012

Bacon, Egg and Cheese Tart

This quick and delicious breakfast takes simple ingredients and combines them to make a delicious morning meal.
I got this recipe/motivation from the Food Network magazine in one of my patient's rooms... it looked absolutely fabulous and I modified it to my own liking.  The pastry puff makes this tart flaky, light and crispy.  The bacon gives it a smokey crunch.  The egg seals it all together and topped off with a hint of chives.

Enjoy!

Takes approximately 30 min (mostly baking time)

1 sheet of Pepperidge Farm pastry puff cut into quarters
4 eggs
3-4 strips of bacon
Fresh chopped chives
Salt & pepper

1.  Take the pastry puff quarters and spread them onto a baking pan lined with foil or parchment paper.  Pre-heat the oven to 425* and use a fork to poke holes throughout the pastry puff to prevent bubbling.  Bake for 9-10 min until solid but not too golden (you will have to bake it again).

2.  While the pastry puff is baking, brown the bacon on the stove-top for 9-10 min.  Remove from heat, place on pan with paper towels to soak up the oil, and crumble.  

3.  Take the pastry puff out of the oven and let cool for a bit.  Use the back of the fork and make a groove into the middle of each puff by pressing down (try not to make any holes in the bottom).  Once flat, crack an egg in the tart.  Salt & pepper lightly, add crumbled bacon.  Return to oven for 10-15 minutes until egg white is... well, white (not clear).

4.  Remove from oven, sprinkle with chives.  Serve and enjoy!

Yummy.  <3


mmm, delicious and flaky <3

Forgive my morning mess >.<
Made this for the boyfriend... extra bacon ;)


Wednesday, November 9, 2011

3 Bean Chili

For as long as I can remember, I've never been a big fan of chili.  Sure, they taste good on hot dogs.  Canned? Only for lunch on the go.  There were so many better options to choose from than to have chili... until I decided to find recipes made with beer.

For some reason, anything fermented, distilled, or has gone through a timely process makes all food taste better.  I stumbled upon this chili recipe since I always thought water was a nice filler for hunger... and beer would be a good substitute.  I fell in love with this recipe after I made it for the first time.  I probably had 3 servings!  One bowl is never enough.  ;)

This easy to make recipe only takes me 30 minutes until it's ready.  Lots of canned goods make this a no-hassle dish.

3 Bean Chili

1 lb. ground beef
2 chopped onions
1 chopped red pepper
1 chopped green pepper
3 cloves of garlic
1 1/2 cups of beer (I usually use a bit more- less thick)
2 16 oz. cans of diced tomatoes
3 cans of beans (kidney, black, and pinto are good choices)
1 can refried beans w/ chilies (thick texture)
1 tbsp cumin
2-4 tbsp chili powder
1 tbsp hot sauce
1 tsp salt (optional)

1. Saute Veggies for 5 minutes with extra virgin olive oil and garlic.  Add ground beef.  Before the meat cooks to well done, pour in the beer until boiling.

Saute all that goodness... you really need the 2 whole onions
for the full flavor! 
I always use extra, so I just buy a tall can.  The benefit?
A beer with your chili at mealtime.  :)

2. Add canned tomatoes and cooked canned beans; stir.
I used the roasted garlic onion flavored diced tomatoes :)

LOVE that red color... too bad chili all looks brown-ish in the end ^^;;

HUGE fan of black beans... used 2 cans of this type ^^

3. Add all seasonings.  I really like cumin so I always add a ton extra.  The hot sauce gives it a kick- add it to your heat preferences.  Stir.
4. Add refried beans w/ chilies.  I like my chili more like a soup texture, so I always add more beer and less beans (i.e. 2 1/4 c. beer and 1/2 can refried beans).  Stir and simmer on medium-low for 15 min.
5.  Enjoy!  A nice touch: serve with chopped green onions, grated cheese, and sour cream.  Serves approx. 10.

Thursday, September 1, 2011

Coffee Cream Macaroons

By popular demand, I present to you.... macaroons.  <3  Here is the recipe I used for this particular sweet:

Coffee Cream Macaroons~

3/4 cup of ground almonds
1 tsp instant coffee powder
1 cup confectioners' sugar
2 extra large egg whites
1/4 cup superfine sugar
1 tbsp crushed sugar crystals (optional)
Tools:  food processor, electric mixer, 1 med bowl, 1 lg bowl, spatula, pastry bag/pipe (frosting tube), 2 baking pans, parchment paper

**Note:  Take out the ingredients for the filling (below) before starting to make the cookies- the butter needs to be softened at room temperature for the filling to taste at its best.

Process ground almonds, coffee powder, and confectioners' sugar in a food processor for 15 seconds (you may have to shake it around to get everything blended evenly).  If you don't have ground almonds like me, I just processed sliced almonds first, then added the rest of the ingredients.  The result should be light and powdery.  With a large strainer, sift the mixture into a bowl and set aside.

In a larger bowl, whip egg whites until you see soft peaks.  Sorry, I forgot to take pictures of the process, but trust me, they're soft and glossy.  Fold the almond mixture into the egg meringue 1/3 at a time because it's really dry and will stick to the bowl.  Make sure the dry mixture is thoroughly folded and cut into the meringue until the batter is shiny and can hold a ribbon-like consistency for ~25 seconds before disappearing.  Make sure you mix it enough because you don't want the end result to crack or be frill-less.  :)

I think the hardest part is making sure you whip the meringue just right.  Making macaroons is easy when it comes to ingredients and preparation, but the technique is what makes it... I guess, an art.

Prepare two baking pans lined with parchment paper, preferably the kind with air in between to prevent burning (if you don't have one, I used two regular baking sheets, one inside the other, to prevent burning).  Pipe the batter into 32 small circles, approximately 2 1/2 inches in diameter, by pouring it into a pastry bag with a 1/2 inch tip.  This batch should make 16 "sandwiches."  Not gonna lie, this was the hardest part for me.  I could not, for the life of me, get these to be perfect circles.  But, they turned out to be pretty nice, so I guess I won't complain.  :P

It's a good idea to tap the pan to release air bubbles.  If you want to style the macaroons, sprinkle the crushed sugar crystals after piping.

After piping and topping, let sit for 30 min and preheat the oven to 325 degrees.  To make sure the macaroon dries enough, test by touching the surface without batter sticking.  This will help create the glossy outer shell.  At this time, it would be time efficient to make the filling.  :)

~Filling~
1/4 cup cream cheese (4 oz)
2 tbsp unsalted butter, softened
2 tsp strong cold black coffee
1 cup confectioners' sugar, sifted

Place all the ingredients in a bowl and beat until smooth (I recommend an electric mixer to save time/effort).  Set aside.
~

Place in the oven for 10-15 minutes, one baking sheet at a time.  I would suggest checking the batch after 6 minutes to see if they're browning too much (in which case, reduce the temperature a bit).  The macaroons are ready when they have a crisp shell and the frilly edges are stiff.  The meringue should easily come off the parchment paper (if it sticks, bake for a few more minutes with the oven door ajar).

We're in the homestretch!  Remove the macaroons from the oven and let cool for 10 minutes.  Transfer to cool on a wire rack.  These macaroons are best when at room temp, so patience is a virtue.  ;)  Take two macaroon cookies of approximately the same size, place a dollop of (no, not daisy) cream filling in the middle, and press the cookies together to form a sandwich.  The cream will look the best when you press it to spread, not manually spreading it.  I prefer adding more filling, but the best part of homemade baking is that you can do whatever you want!


Hope you enjoyed the recipe for these bite-sized sweet treats~ let me know how it goes if you try it!


Friday, August 26, 2011

Lemon Pepper Tilapia

Here is a simple and light dinner that takes less than 30 minutes to make.

First, take the fish fillets.  Rub a bit of extra virgin olive oil on both sides so it doesn't stick to the pan/foil and so the seasonings can stick.  Sprinkle lemon-pepper seasoning, garlic powder, paprika and basil leaves all over the top (I like a bit of extra lemon-pepper, so I rub that seasoning on both sides).

Pre-heat the oven to 350 degrees, and make sure you cover the fish with foil.  I set the fish in for 20-30 minutes until the fish is no-longer transparent and becomes white.


The fish has little to no "fishy" taste.  Best with a
wedge of lemon spritzed on top just before eating.

Rotini Pasta as a side dish.  Fairly simple and easy to make,
but I would suggest making it a day before so the flavor can
soak in (marinate the veggies).  Recipe followed online!


The girls loved the juice!  I mixed pineapple-mango juice, orange juice,
and a strawberry punch to some ginger-ale.  Stirred, on the rocks.  ;)
Quick, easy, and affordable.  Any side dishes can be prepared with it- potato salad, rolls with butter... anything!

Friday, August 12, 2011

Yellow Chicken Curry

Maybe I should have a category just for curries.  Since my first post, this will be my 2nd post on curry (out of 12).

BUT, the difference is, this kind is the Chinese curry.  Yes, there are different curries.  YES, they all taste different.  Hm, maybe I should try making a Thai curry, too....

Anyway, the Octopus helped me out with this one (since I didn't exactly make the first one the best).  We peeled and chopped garlic, lemongrass, carrots & potatoes, then sliced chicken into thin pieces.  It would have been nice to add onions and tomatoes, but they weren't available at the time.

Sautee carrots & potatoes with garlic and oil ~
Add chicken and lemongrass~

*mix mix mix*
Official helper ^_^  She did so well *pat pat*


Add yellow curry powder and water until almost
covering the mix (cubes are actually a bit easier to use)
Add a little squeeze of this paste- it gives the curry a kick!

Salt and bay leaves for flavor~

*mix mix mix*


Once everything is mixed in, put over low heat
and simmer stirring occasionally

Voila!  Yellow Chicken Curry <3
Curry with white rice on the side is the best.  <3  Have a go at it!